Last year if you recall, we teamed up with UTV Canada Inc. and brought you the “Predator Build”, a Can-Am Maverick X xc that we transformed from “Mild to Wild”. The “Predator Build” was a unique experience for us, as this would be our first publicized build project. The unit received abundant media exposure and praise, it was a great success not only for us, but also for all parties involved.
This year we wanted to repeat the experience, so we immediately contacted our friend Ken McDonald from Lucas Production. Without a moment of hesitation, Ken once again decided to join our build project team. Our friend the television producer however had a hidden ace up his sleeve and he felt it was the right time to drop the news on us. This time around not only would this build be featured in his French television series “Histoires de Sentiers” but it would also be showcased in his new and upcoming English series “Off-Road Zone”.
This news was huge, especially for us here at UTV Planet. Our readers would get to experience the evolution of our build not only in print but also via “Off-Road Zone” this fall on Wild TV. Now with all the media elements in place, we could start to conceive our next build project.
THE CONCEPTION PHASE
If you are in the market for a new UTV right now, you realize as we do that there are many good units on the market these days. We are fortunate to practice a sport that is evolving to the point that a consumer has a vast variety of units to choose from, based on his/her riding style and preference. So once again we were faced with the tough choice of vehicle selection.
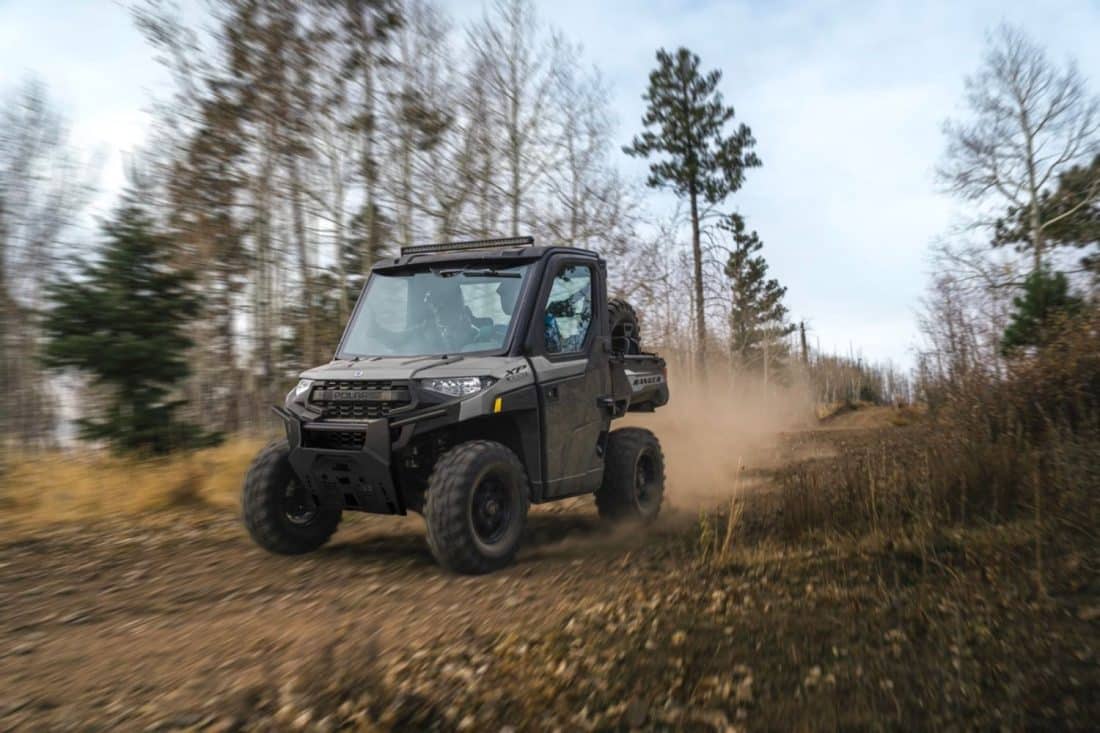
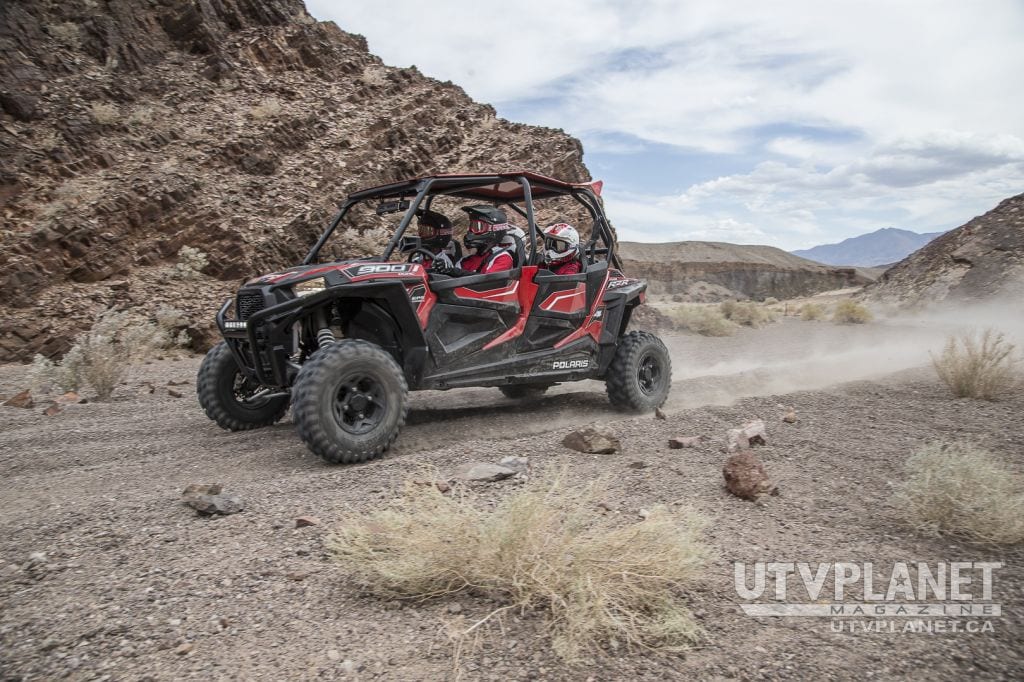
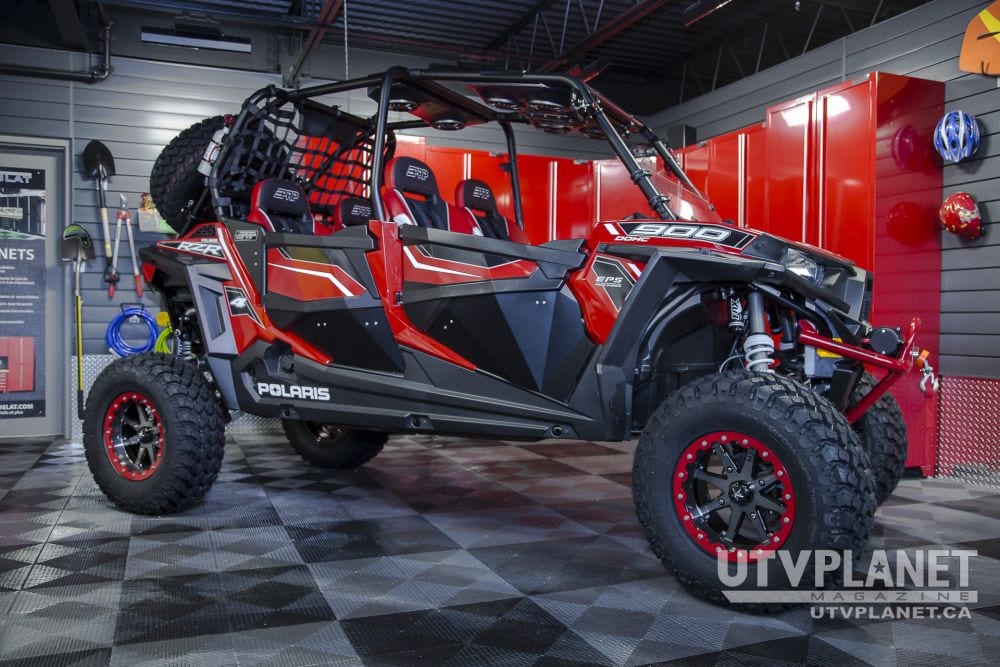
However, one unit that was released in early January of 2015 drew our attention. It was introduced as one of the most versatile multi-passenger side-by-sides available: the Polaris RZR 4 900 EPS. It’s no secret the love we have for the Polaris RZR S 900, as it was one of our top-3 picks for 2015. The Polaris RZR 4 900 shares many of the same attributes as the RZR S 900; 75 horsepower, ProStar 900 EFI engine, Dual A-Arm Front and Rear Suspension, High-Performance All Wheel Drive (AWD) and a 60 in/152.4 cm width. This unit was perfect for the type of build we wanted to achieve, so Polaris was contacted for a loaner vehicle. When Polaris accepted to loan us the unit, we could finally apply a “check mark” against vehicle selection on our long to-do list.
Since we wanted this build to be bigger and badder that last year, we had to find a location for our build project that would reflect this. Our search stopped once we were introduced to Luc Cuillerier, the President of GarageBox. GarageBox is a leader in the field of residential garage organization, ranging from storage units to flooring and accessories. Basically if you want to “Pimp out” your Garage, this is the place to go-to! Luc graciously loaned us one of his demo garage units for our build and also for the shooting sessions.
The next several weeks were spent by our team communicating with some of the biggest names in the UTV aftermarket parts industry. As we had a particular look and feel we wanted to accomplish, parts selection was crucial and many big names stepped up to help us realize this build.
With the parts selection completed, one item remained for this build to be unique: a custom wrap. For this special job we turned once again to our friends from affichage.ca. We reached out to Jonathan Gagné, President of Affichage.ca with a very basic color idea (3 colors in fact) and his team immediately started masterminding a new unique concept for us.
The conception phase of our Polaris RZR 4 900 build project was now concluded and what follows led to the birth of the “Trail Warrior” (#trailwarrior).
THE DECONSTRUCTION PHASE
We took the stock unit and started breaking it down by removing the stock seats and belts, tires and rims, front and rear shocks, rear axles and exhaust. The rear passenger back panel along with the entire cargo bed was also temporarily removed. Finally, some factory plastics and cockpit paneling also needed to be provisionally removed to facilitate the passing of wiring for certain electrical components.
THE BUILD PHASE
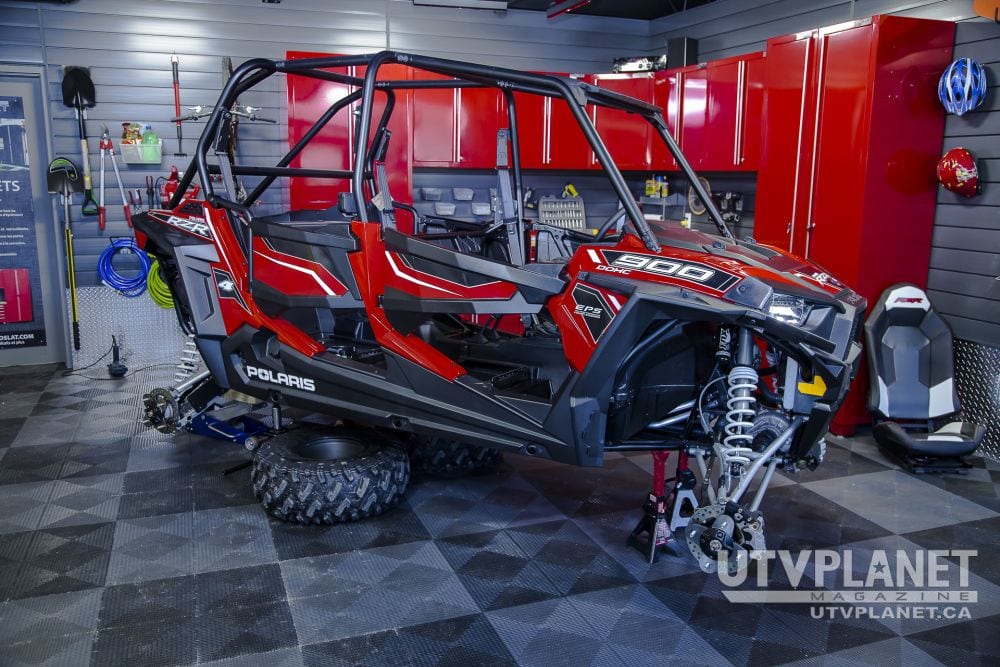
After months of logistics, the almost bare unit now stood firmly up on support stands and the transformation was ready to begin.
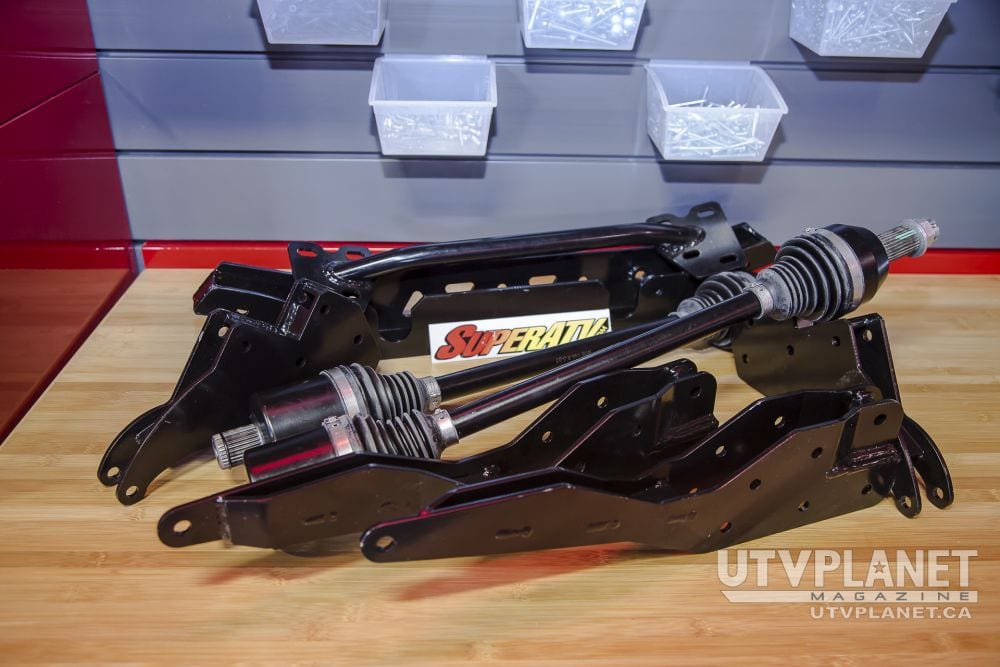
Since we knew this unit would face some harsh trail conditions in its near future, we started with SUPERATV 3” (inch) lift kit. The kit includes: heavy-duty front and rear shock relocating brackets and two Rhino Brand axles. Installation is made easy as the kit is 100% bolt-on and provides for a full 3” (inch) of front and rear lift. The lift kit is designed to prevent CV binding or damage, this is accomplished by using upper shock relocating brackets instead of the traditional lower brackets. This method improves ride quality, axle angles and steering geometry.
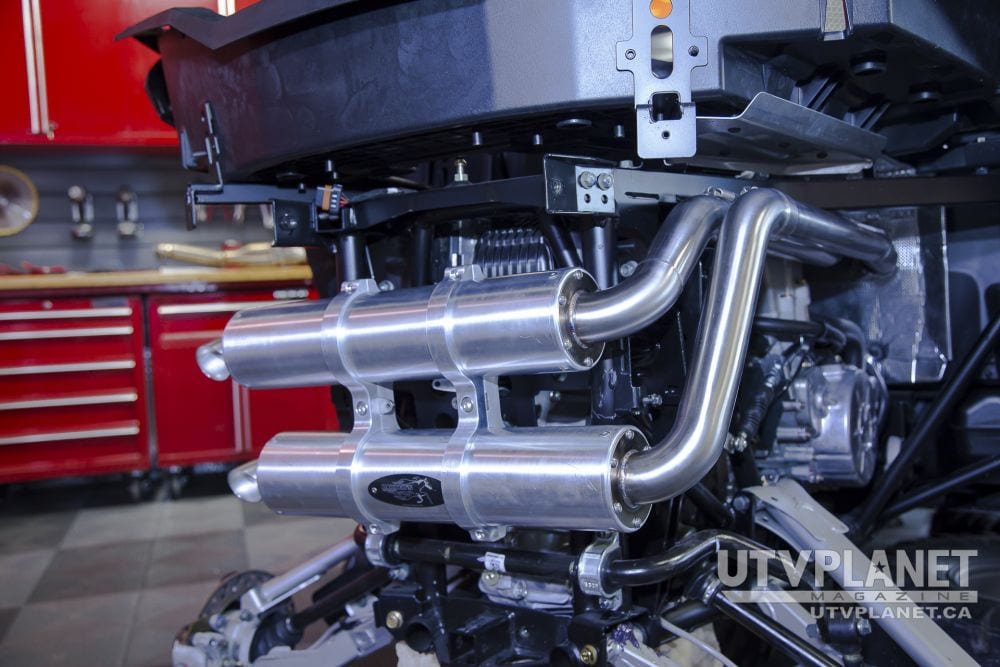
With the lift kit and rear axles installed, we now turned to the installation of the BARKER’S PERFORMANCE full dual exhaust system. This system is quality crafted from premium materials and methodically hand welded. The exhaust pipe section is made of (304) stainless steel that is TIG-welded with seam-reduced interior surfaces for smooth flow and the cans are comprised of (6061) aircraft grade aluminum. Swapping out an exhaust may seem like an extensive chore, however the installation process is made easy with clear and simple to follow instructions. With the new exhaust system now installed, we test fired the unit. The room immediately filled with a deep, throaty rhythm of raw power and now the Trail Warrior would be heard prior to being seen. According to Barker’s DYNO test you can expect a horsepower increase of 6 (HP Gain) and also a weight savings of 5 lbs.
Now that the under carriage work was completed, we could reassemble the rear cargo box and proceed to the installation of the spare tire carrier and the front bumper. For the spare tire carrier we decided to go with a POLARIS genuine accessory. The Polaris spare tire carrier is made of strong tube-steel construction with a black powder-coat finish that is a breeze to install (bolt-on). This spare tire carrier doesn’t occupy any of the cargo bed space; great for those who carry lots of gear when they ride.
For the front bumper we installed a HMF “IQ Equipment” U4 Winch Front Bumper. The U4 winch front bumper is constructed from .095” wall steel tubing and, as the name implies, it can house standard winches. We chose the (Red) finish to match the look of our unit and it was once again super easy bolt-on installation. The bumper not only offers an increased form of protection but also adds an aggressive look to the front of the unit.

To finish off the front-end, we installed a SUPERATV 4500 lbs Synthetic Rope Winch (with Wireless Remote). This kit comes with the 4500 lbs synthetic rope winch (obviously!), an aluminum hawse fairlead, a dash mount control and a wireless remote. We drew power direct from the battery so this was a tedious process of running wiring, however the install process itself is easy and very well documented in the installation manual. This winch also offers some nice features: brakes to hold on inclines, weather proof seals and a reliable smooth running electrical system for sustained battery life.
With some of the more labor-intensive add-ons installed, we now started to move towards the interior of the cab. The next items on the menu and probably one of my personal favorites: the sound components. I truly do enjoy listening to my tunes while riding and I could think of no better company to turn to for this than SSV WORKS. We started by installing the SSV WORKS (WP-RZ3O4) overhead weatherproof audio system. The installation of the WP-RZ3O4 is simple: the unit clamps in overhead to the stock cage and has an easy 2-wire hook up. Like all SSV Works systems, the enclosure is constructed of fiberglass for maximum durability and the best sound quality.
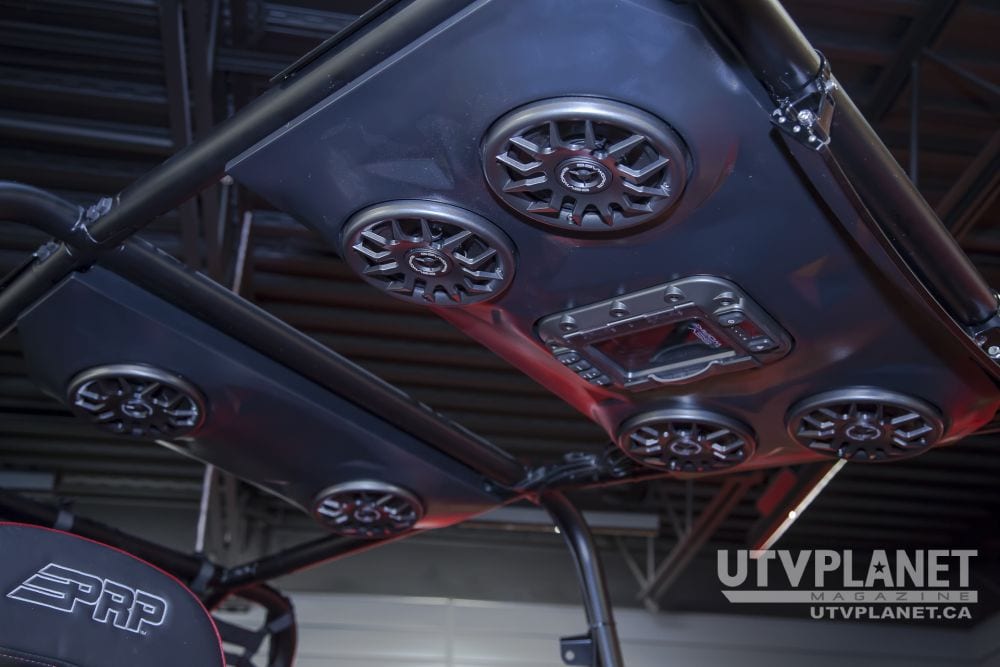
The WP-RZ304 unit has an intensive and impressive set of features: Bluetooth connectivity with over 30′ of range, weatherproof docking station, water tight locker with slam-latch polycarbonate door, charging capabilities, internal 50 watt x 4 ultra-efficient amp, waterproof marine 2-way 6.5″ speakers, 4 LED dome light, on board bezel mounted rubberized controls, iPod control (volume, track fwd/bck, play/pause), 3.5mm aux input for MP3 or SAT radio and FM tuner with backlit display with external antenna.
Since we wanted to go big on sound, we also installed the optional (WP-RZ3O+2) 2-speaker add-on unit. This unit is installed overhead to the stock cage as well and connects to and draws power from the (WP-RZ3O4). The amplifier in our main unit (WP-RZ3O4) is 50 watts x 4 and this add-on utilized the 2nd half of that amplifier. As I mentioned, we really love our tunes!
With the sound components installed and firmly in place, we now proceeded to install the rear net and half windshield. For the rear net, we opted to go with the POLARIS (Racing Rear Panel). This rear netting not only provides outstanding protection at the rear of the cab but also delivers rearward visibility & airflow. The rear net is constructed from ultra-strong & durable fabric and it attaches to the vehicle framework. For the half windshield we once again turned to SUPERATV. We installed the non-tinted version that is constructed from super strong, scratch resistant 1/4” thick AR Makrolon with a bottom seal that contours the unit’s design. The kit comes with all necessary hardware and instructions to allow for fast and simple installation.
Prior to completing the rest of the interior, the roof needed to be installed. We decided to go with the POLARIS Aluminum Roof, as we liked the way the roof sat on the cage and complemented the unit. It is constructed from strong and durable (5051) aluminum and this model came with a white powder coat finish. The roof installs quickly with the supplied hardware in the designated mounting positions. Not only does this roof provide outstanding overhead protection but it’s also sealed to eliminate vibrations.
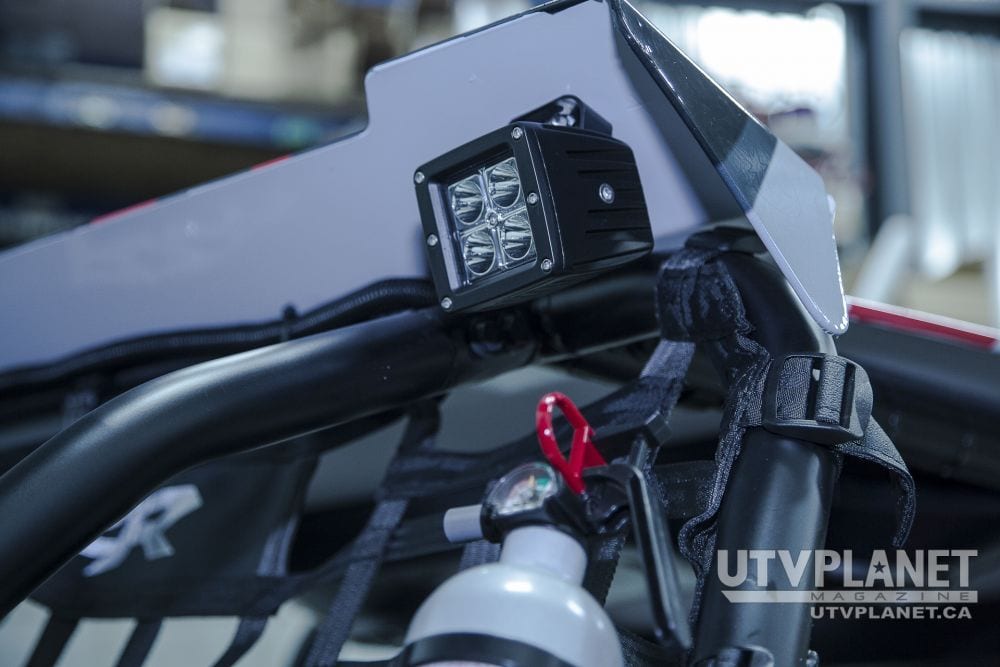
A few more electrical components needed to be installed prior to applying the finishing touches. Since we frequently trail ride at night, we decided that we needed to install LEDs on the inside portion of the rear roof tail. These lights would assist to illuminate the trail when backing up or to possibly assist others. For this we turned to WICKEDBILT and installed two 3″ LED Square. Each light features four 3w Epitar LED bulbs for a total of 12 watts and can pump out 950 lumens of illumination, perfect for our needs. We mounted the light with the included hardware and ran the wiring for the electrical connection, easy but once again wiring can be tedious. Because being seen is important, especially at night, we also installed a 72″ Kool Whip from WICKEDBILT. These whips are available in a variety of colors and standing at 6 feet tall it will definitely help show others where you are on the trails at night.
The vehicle was finally starting to take shape and we were very eager to start applying the finishing touches. Comfort and especially safety were a big priority for us; we had already installed some add-ons which heightened creature comforts, however the most important were to follow. With the driver and passengers in mind, we wanted to improve not only their comfort and safety levels but also their overall ride experience, so for this we turned to PRP SEATS. First we installed 4 GT S.E suspension seats from PRP Seats, which we deem to be the most comfortable seat on the market today. PRP Seats are constructed from premium quality materials and PRP is always listening to its customer base and is constantly developing seats that are in demand. The installation calls for removal of the seat support rack from under the stock seats and mounting them back on the PRP seats. Once the hardware is mounted, simply re-install the seat in its original mounting location. I can assure you that once you ride seated in a PRP seat, you will never want to ride in a stock seat again!
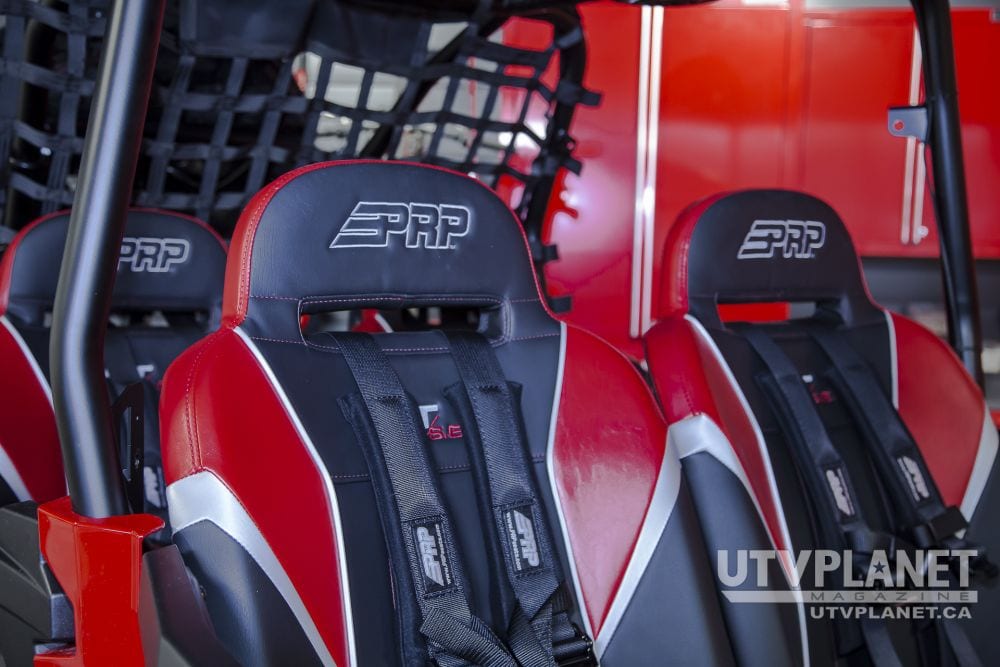
To complement the seats and to specifically increase driver and passenger safety, we installed 4 sets of 5.2 safety harness from PRP SEATS. This 2”, 5 point seat belt has sewn in pads for comfort, all black hardware for cool styling and quick adjusters on the shoulders. The new quick adjusters fix a problem that has been an issue with off road seat belts for years. Once a belt gets some dirt and water in the webbing they become very difficult to adjust, these new adjusters will always provide a quick easy to use seat belt.
To further enhance the comfort level of the vehicle occupants, we also installed PRP SEATS lower door extension and a set of door bags with kneepad. The lower door extensions are made of aluminum and they simply bolt on to existing holes in the stock RZR door. We all realize the benefits acquired from a set of full doors, this simple and cost effective add-on turns your half doors into a set of stylish full doors.
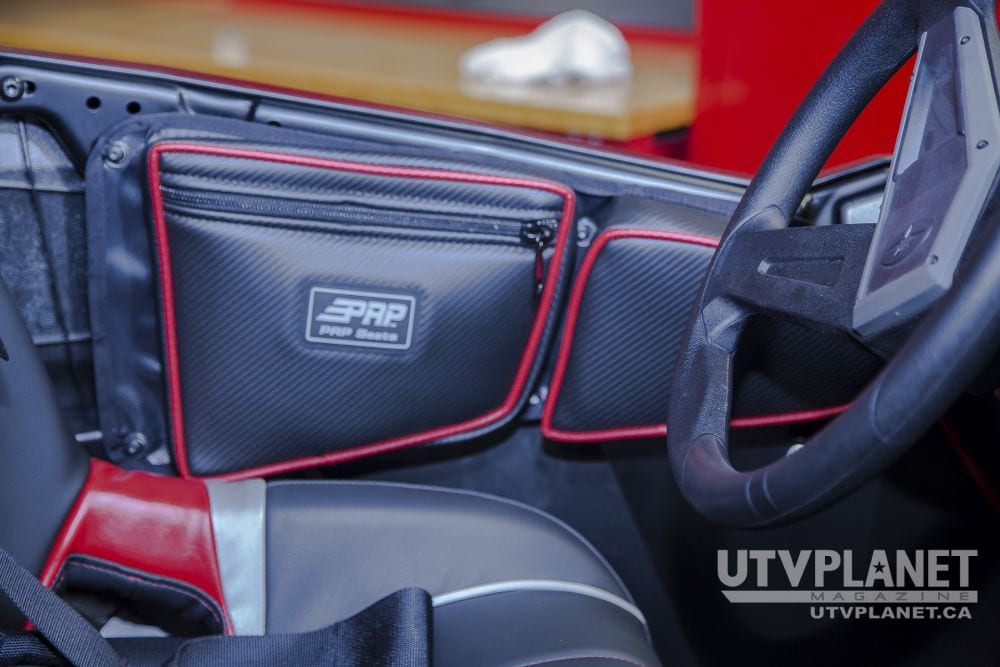
When we ride, we all have the tendency to rest our knee onto the door panel. We also all are aware what happens to said knee when we hit an obstacle on the trail – ouch! Solution: the PRP SEATS door bag with kneepad. Not only does this add-on provide convenient extra storage, but it also provides a comfortable location to rest your knee. We installed one set for the driver and front passenger and the doors bags simply install onto the doors using the factory screws.
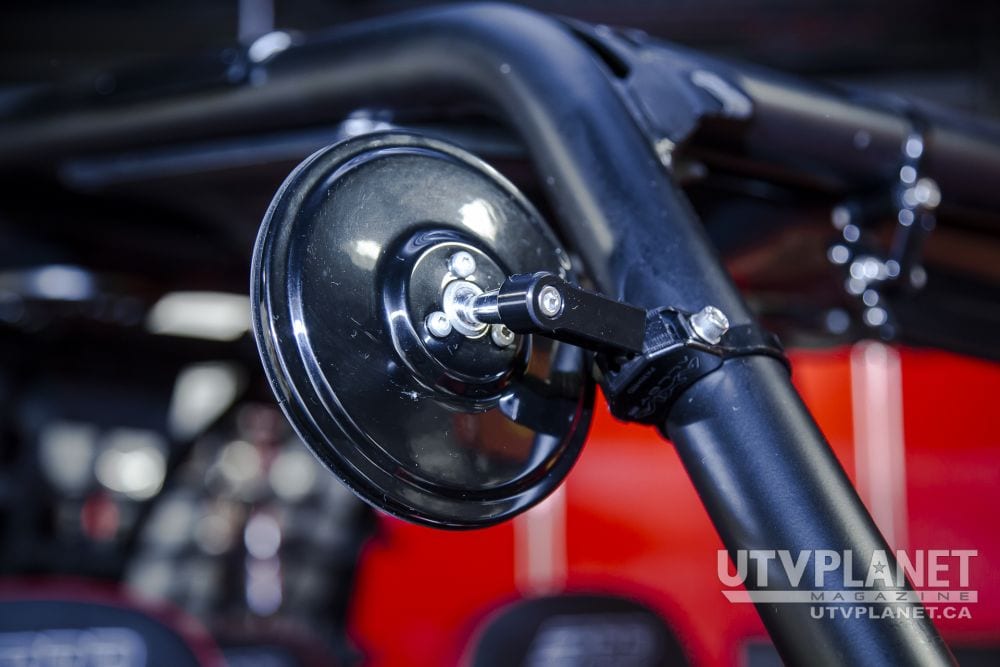
Enzo Ferrari once said and we quote “What’s behind you doesn’t matter” but in our case this wasn’t necessarily true. Being safety conscious we needed to install mirrors, but not just any mirrors, this unit deserved some bling! For this we turned to AXIA ALLOYS and we installed a 17″ Billet Panoramic Rearview Mirror and a set of 5″ Round Convex Glass Billet Arm Side Mirrors. The 17″ billet panoramic rearview mirror offers the widest non-distorted viewing angle of any mirror on the market. This mirror is very slightly curved only in the horizontal direction so that you get a nice wide view of what is behind you without distortion. The 5″ convex side mirrors feature a fully adjustable billet arm so that they can be mounted on both horizontal and vertical bars of any angle. These mirrors definitely complemented our unit and had the desired effect we were looking for.
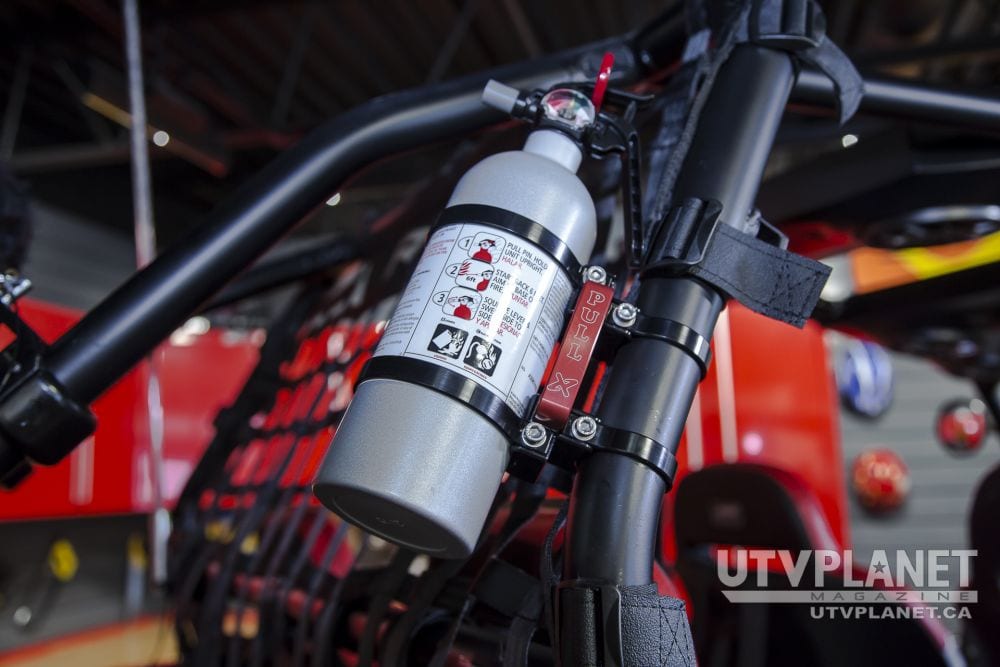
One more safety item needed to be installed, one that no vehicle should be without: a fire extinguisher. Many fire extinguishers are available on the market, however the one from AXIA ALLOYS is best suited for our needs and it matches our thematic perfectly. The billet fire extinguisher mount is aircraft grade 6061 aluminum and the stainless steel components are precision machined for a perfect fit. Most important, all contact points are o-ringed so that it will not wear or rattle in even the most demanding off-road environments. We mounted the fire extinguisher on the spare tire carrier and if/when you need to use it, just pull the red quick release handle and the 2 lb fire extinguisher is ready to go.
We could finally see the transformation start to materialize; however a few more items needed to be installed before this unit could earns its name of the “Trail Warrior”. The same way a good pair of shoes completes any attire, we needed an awesome set of tires and rims. We could think of only one company to help us with this, COLORADO COMPONENTS. We turned to COLORADO COMPONENTS, the manufacturer of MSA WHEELS and EFX TIRES to help us complete our unit’s attire.
We decided to install a set of 30” MOTOHAMMER tires from EFX TIRES mounted on a set of 15” M21 LOK (Red) beadlock rims from MSA WHEELS. In our opinion, the MOTOHAMMER tire is the single best hard pack tire on the market, boasting the best contact patch, superior traction control, rugged 8-ply carcass and Radial DOT rated performance. Trail riders will appreciate the 8-ply carcass and completely re-engineered soft compound that conforms to your terrain.
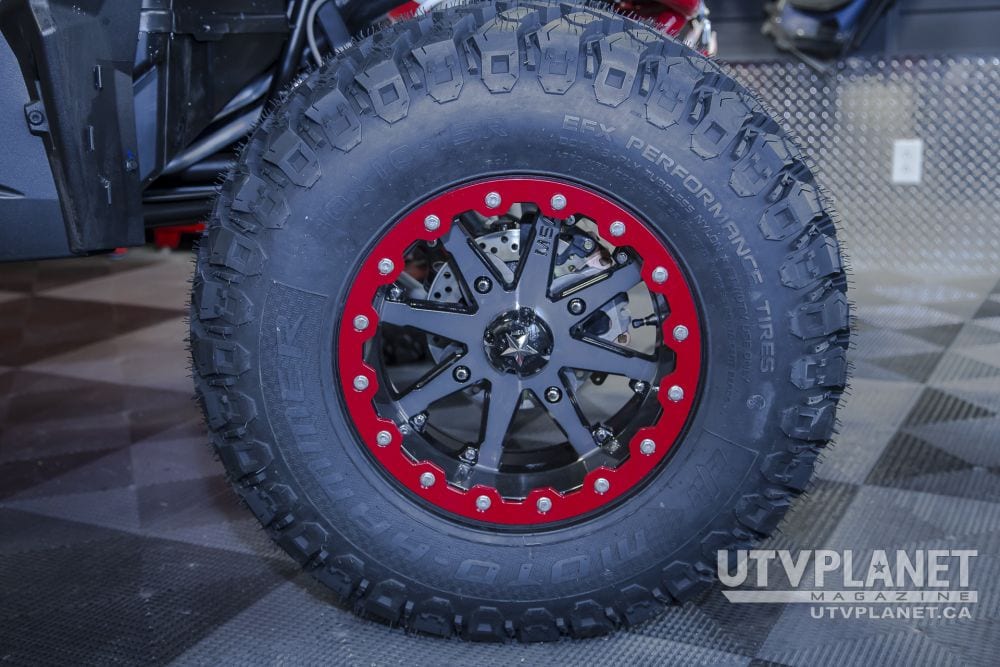
The 15” M21 LOK rims not only looks amazing but also drastically enhanced the look of the unit. Each M21 LOK rim comes with all of the necessary parts to professionally lock any tire to your wheels to ensure a safe and quality ride. The “gunmetal” finish used on this rim is actually a dark tinted clear-coat that is overlaid on top of the micro-machined wheel face adding depth, charcoal highlights and it is a completely new industry option. The Gunmetal finish is accentuated with gloss black automotive grade paint, only offered by MSA WHEELS and currently only offered on the M21 LOK in this combination. The unique LOK rim design repels dirt, mud and debris fast making clean up a snap.
We lowered the unit to the ground, removed the support stand and took our first good look at our almost completed project. At this point a boasting session was definitely in order, the unit looked awesome! However the last vital piece of the puzzle remained to be professionally installed: the custom wrap.
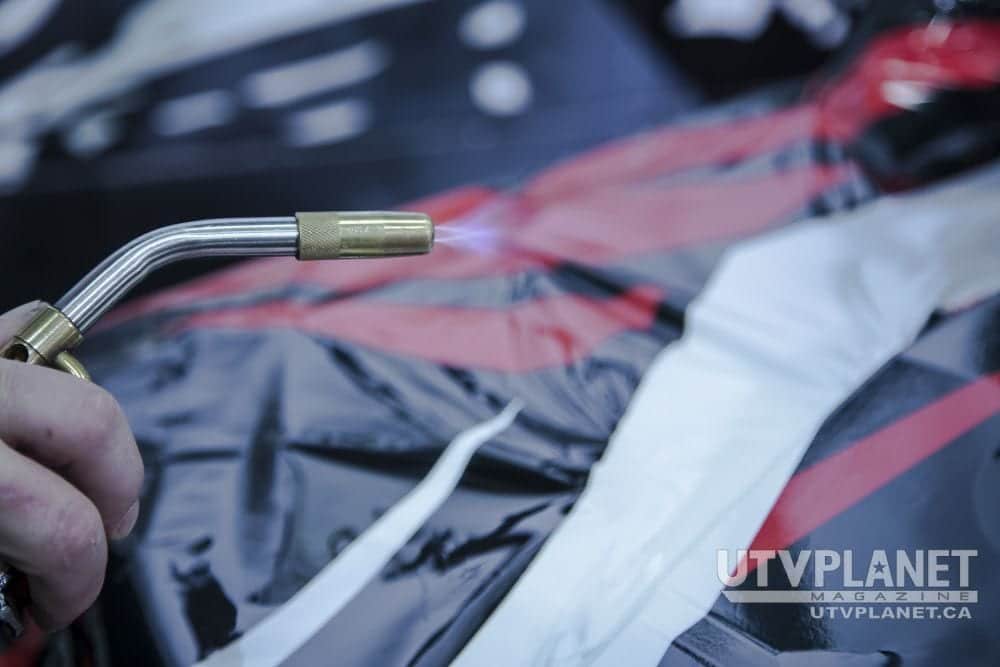
We loaded the unit into our closed trailer and set-off to our final destination for this build project, AFFICHAGE.CA. Upon our arrival Jonathan, who was eager to show us several wrap samples he and his team had put together, greeted us. Once we selected our design, Jonathan proceeded to take some unit measurements and started to print out our design. The design is printed on a 3M vinyl adhesive paper and then is laminated with a 3M UV protection film. What is also unique about the approach used by AFFICHAGE.CA is that they do not use templates. They print out square section based on measurement and painstaking apply the wrap to the unit.
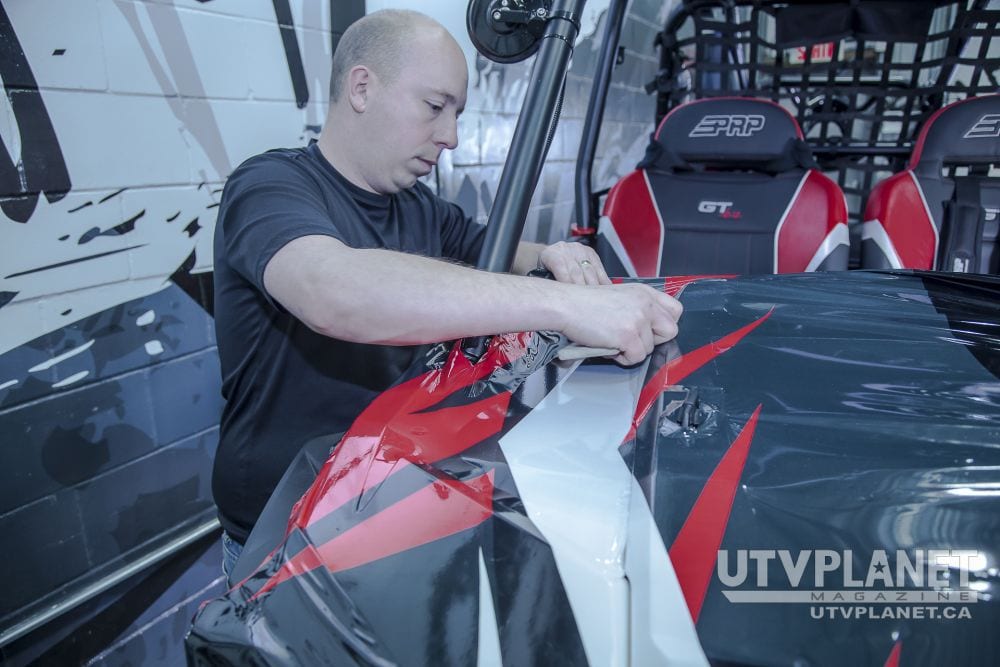
I will repeat word for word what I wrote about AFFICHAGE.CA in a previous article, as I can’t find better words to describe the company or their process. The guys over at affichage.ca are true professionals in the art of wrap design and installation. Watching these guys create and install the wrap was like watching an artist paint on a virgin canvas, totally mind-blowing!
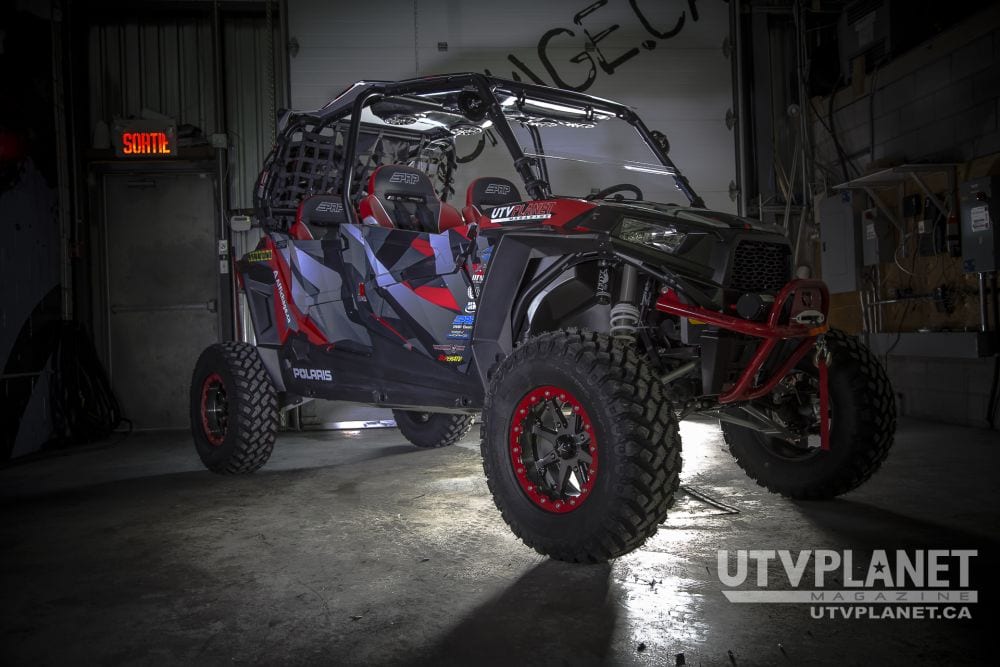
Once the last section of the wrap was applied, we all stood back and gazed upon our completed build project. We are all overwhelmed by a proud sense of accomplishment as this build exceeded our every expectation. The combination of all the high-end quality parts and accessories, time and energy and logistics all resulted in this awesome unit we proudly nicknamed: Trail Warrior.
During the course of this article, we briefly mentioned many aftermarket parts manufacturers and their respective products and/or service. We would like to thank all these partners for contributing to our build, without them this project would have been impossible. We invite you to visit their websites for more information on the products and services mentioned throughout this article.
A very special thank-you to POLARIS INDUSTRIES for loaning us the Polaris RZR 4 900 EPS
PARTNERS BUILD LIST
| AFFICHAGE (wrap) | www.affichage.ca |
| AXIA ALLOYS | www.axiaalloys.com |
| BARKERS EXHAUST | www.barkersexhaust.com |
| EFX TIRES | www.cocomponents.com |
| GARAGE BOX | www.garagebox.ca |
| HMF “IQ Equipment” | www.hmfracing.com |
| LUCAS PRODUCTION | www.lpvi.tv |
| MSA WHEELS | www.cocomponents.com |
| POLARIS | www.polaris.com |
| PRP SEATS | www.prpseats.com |
| SSV WORKS | www.ssvworks.com |
| SUPERATV | www.superatv.com |
| WICKED BILT | www.wickedbilt.com |